Monday, May 30, 2016

Cup changing frequency

Happy Memorial Day. The unofficial start to summer is here and so is the meat of the golf season. This past weekend saw temperatures soar, many golf rounds played, and another member tournament.

When the golf season ramps up so does our diligence in caring for the turf. The stress that Mother Nature applies, in combination with stress that comes from maintenance and golfers, can take a toll. Recently, some questions have arisen regarding our cup changing “schedule” and why we seemingly change cups so few times. Similar to everything we do, our schedule is only a framework that takes into account many factors including: member satisfaction, turf health, outside event scheduling, and weather.

Our regular routine consists of changing all 18 cups plus 5 practice green cups on Tuesday. We do not change any cups on Wednesdays. We then change odd numbered holes on Thursday and Saturday and even numbered holes on Friday and Sunday. We also change the practice green cups again on Friday. What this rotation amounts to is every cup 1-18 being changed 3 times per week and the practice cups being changed 2 times per week. However, a cup that was not changed freshly in the morning plays no differently than a cup that was changed freshly. The only difference is visual, and depending on how many people played and how careful they were when reaching in for their ball, the visual difference would be minimal at most. You can also read here the other factors we consider when selecting pin locations. There are several dynamics that have led us to this rotation and deter us from increasing the amount of times per week that any given cup gets changed.

To cut a cup, we literally cut a piece of the turf out and move it to the previous hole. We call this piece of the green the plug. This rotation continues endlessly. The reason this works so well is because the tool we use to cut the cup takes all the soil and roots of the turf from each place along to the next place. The turf barely knows it was moved. However, it is still visible on the surface where the previous plug is on a green. It is also much less smooth to putt across an old plug. We try and stay away from old plugs to give the best possible putting area around a new cup. When the turf is growing well, an old plug can be healed well enough to putt across in 3-5 days.  If we are changing cups too often, though, we are back to the same areas too soon for the plug to heal. Repeat the process through the season and it isn’t long before people are forced to putt over old plugs constantly.

With regard to outside events, many of the outings that we host have prizes on par 3 holes for holes-in-one. Each of these usually requires a minimum distance from which the hole is played to qualify. To accommodate the necessary yardage, we put the pins either in the middle or back of the green. By doing this we allow the tees to be moved up closer, resulting in an easier hole for the outing. The alternative would be if we put the cup in a front location, then the tees would be moved farther back to achieve the minimum yardage for the prize and a more difficult hole. A prime example is hole #9. If the pin is in the front and the tees are back to gain the necessary prize yardage, then there is very little ground short of the green on which to land a shot, resulting in shots in the water (or in bunker or rough on other par 3’s). This can slow the pace of play down further than outing pace of play already is. However, when the pin is moved to the middle or back, then there is 10-20 yards of green short of the cup on which a shot can land, resulting in putts or short chips for second shots. So, subtracting all front pin locations, we only have 2/3 of the available cup locations for those outings all season.

Green speeds also play a role in determining our frequency of cup changing. As we increase green speeds, the area available to place a cup decreases. What might be a manageable slope when the greens are rolling 9’ suddenly becomes impossible to stop a putt when the greens are rolling 11’ or faster. So now, not only are severe slopes off limits, but so are marginal slopes. Again, the area available is shrinking.

The result of all of these factors has led us to our current schedule. Because we come back to the same areas sooner, those areas get less time to heal from stress. Turf health would begin to decline. At this point, we either take certain areas out of rotation, further shrinking our available space and further stressing other areas, or we raise the mowing height and slow the greens down so we can use previously unavailable space. Once it reaches this point, no one is happy.

Through the year, there are certain times where we do increase our cup changing frequency. Tournaments are a good example. However, we can’t increase our frequency for EVERY tournament because of the number of tournaments at the club. Depending on what other events are occurring adjacent to the tournament and what the weather is like, also factors in to whether we increase frequency.

So, we have thought through the scenarios and developed this schedule. It isn’t perfect and does not completely satisfy everyone, but we do not make the decision lightly and we do not make the decision without reasons.

Etiquette Reminder of the Month

When you splash bunker sand onto the green after your shot, please brush away any large piles or clumps that may have ended up on the green.

See you on the course!
Joe

jvillegas@bwrc.org

Monday, May 23, 2016

Other grounds work

As the title of our department implies, we are not only responsible for the golf course, we are responsible for all of the grounds at Bretton Woods. There are an extra 150 acres that need attention and in the last couple of weeks we have been spending some time in those other areas.

We assisted in the planting of 33 trees on the property recently. 26 trees were planted along the entrance road, from River Rd. to the clubhouse parking lot. The existing trees along the entrance are not being removed though; this was simply an insurance plan to make sure that as the current trees continue to age and decline, we will have trees ready to fill in. Instead of waiting for the old trees to need to be removed and being left with an empty entryway, we planted the new trees in an effort to be ready. We also added 1 tree in the clubhouse parking lot to replace a tree that had been missing for some time. 3 trees were added at the pool parking lot and 3 trees were planted on the grounds around tennis. While the labor for planting was contracted out, long term care falls to us. We have already been out several times to water each tree (despite the rain!) as well as stake a few trees that developed a lean in the wind we had last week.

We also have been busy prepping our new and existing sand volleyball courts. We fertilized the sod around the new court inside the pool compound. We continue to monitor and aid in any way possible to make sure that it is stable and ready for the hundreds of people it will see for Memorial Day weekend. We have a new net and court tape ready to install as well. We also have been working down at the existing volleyball court near the soccer fields. We edged the entire perimeter and removed the debris. We also installed a new net and court tape on that court as well. Our plan is to incorporate raking of the courts into the routine of our bunker raking crew. The plan is for the bunker staff to head to the pool volleyball court and then to the court near soccer 2-3 days per week once they finish raking bunkers on the golf course. We will also be ready to rake for any planned event that may utilize the courts.
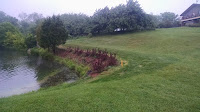
We have not completely ignored the golf course lately, though. We caught up on as much mowing as we possibly could in the brief stretch of dry weather we had. We also added some new plants near the pond on #9. We had previously removed some very unattractive trees and shrubs from the bank near the green, and last week we added 10 ‘Wine and Roses’ Weigela plants to fill in the gap. These new shrubs will bring some vibrant color to the spot that will also be visible from the deck of the clubhouse.


We welcome our Grounds department responsibilities and enjoy the opportunity to maintain many different areas outside the golf course. Having such a large property presents many different challenges, but it also provides the opportunity to meet many different expectations.

Etiquette Reminder of the Month
When you splash bunker sand onto the green after your shot, please brush away any large piles or clumps that may have ended up on the green.


See you on the course!
Joe

jvillegas@bwrc.org

Monday, May 16, 2016

Wood chip pile

Though this picture is interesting because of the flooding,
in the background you can also see the wood chip pile
prior to any reclamation work.
Several years ago there were two events that devastated many trees across the property: Derecho and the herbicide Imprelis. Between the two, many trees were lost and the cleanup is still ongoing. There was a large wood chip pile behind 3 green, along the wood line between 4 and 15 tees. This was debris that had been chipped during the cleanup process. It was an eyesore that slowly became buried behind other priorities. This winter and spring we were able to reclaim the area to a more natural state.

Most of the wood chips in this particular pile were from trees that had been killed by Imprelis herbicide. Because of the remnants of the herbicide present in the wood, the mulch could not be used for any purpose around any plants, shrubs, or other trees without the possibility of killing the healthy plant. The grounds department has several “maintenance roads” around the golf course. These are small shortcuts that we use to get from one place to another without using the regular cart paths. They are constructed from wood chip mulch exactly like the debris of which we needed to dispose. We put a top-coat layer of new mulch over several of our existing maintenance roads using these wood chips. We even were able to build an entirely new maintenance road behind 6 tee using the same material. By doing this we were able to use almost the entire pile without wasting anything. The remainder of the pile was graded smooth.
Wood chip pile after regrading and early seedling germination

Once the pile had been leveled and the area looked natural again, we did not want the site to be just bare wood chips. This would have been just a flat version of the pile that had been ugly to look at in the first place. Luckily, the bottom layer of the wood chip pile had degraded so much that it had actually turned into decent soil. So, we selected a very hardy seed mix to plant into the area. We spread the seed, fertilized with an organic fertilizer, and dragged the seed into the soil in mid-March. 
By early April we had seed germinating. By early May the grass was growing well.

Grass is several inches tall in this picture
With minimal inputs we were able to restore the wood chip area to a natural grass area to match our other low-maintenance areas around the property. While this work did not affect the way the course plays, we were able to improve the aesthetics. We took an area that looked particularly bad, and not only made it look better, but we also were able to use some of the material around the course.


Etiquette Reminder of the Month

When you splash bunker sand onto the green after your shot, please brush away any large piles or clumps that may have ended up on the green.

See you on the course!
Joe

jvillegas@bwrc.org

Monday, May 9, 2016

Spring dead spot update

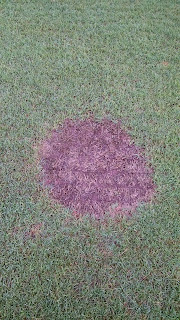
Spring dead spot is a disease of warm-season turf grasses, especially Bermuda grass. It is a disease that cannot be entirely prevented or cured, only managed. Over the last couple of years we have made progress in the management of the disease and we will continue to learn more each year.

You can read more about the specifics of the Spring Dead Spot disease here or read about the organic compost program we have undertaken the last 2 years to help combat the disease.

Notice the green grass in the center
Green grass in center again
This year was another different spring from the last 2, so the Bermuda grass reacted in another different way. Our first green tissue in the fairways was spotted March 8th, a full 3 weeks ahead of last year. By all indications we were off and running, well ahead of last year’s pace. But Mother Nature applied the brakes in early April. Within the first 10 days of April we had 3 nights that dropped below 25 degrees! That is not Bermuda grass weather. All of the green tissue that had started to emerge was shut down immediately. The Bermuda grass went back to its dormant brown color. By the middle of April temperatures returned to normal and the Bermuda grass essentially started over. What we noticed was that any tissue that never turned green was healthier after the cold than the tissue that had greened up. Finally, once the Bermuda was growing, we were able to start to take stock of our spring dead spot infestation.

Notice no turf in center
Absence of turf in the center 
We are pleased with the continued progress we have been making against the disease. There are fewer incidences overall, as well as fewer completely dead areas amongst the diseased locations. Similar to the evaluation regarding our seed head control program that was discussed last week, we also ran a test regarding our chemical control of spring dead spot. Last winter, we purposely skipped one trouble area with our chemical control. Instead, we only applied the organic material to make sure that we were investing wisely in the chemical applications. So far this spring we have seen that the chemicals are indeed helping to lessen the severity of the disease. Looking at the pictures, in areas that received both compost and chemical treatments, there is far more healthy tissue within the disease circle. The area that only received compost has no grass inside the circle. So it is apparent that the combination of compost and chemical treatments is improving our control and healing.

A second indication that we are holding our own against spring dead spot is depicted in the pictures we have taken dating back to 2014. On April 19th 2014, April 19th 2015, and now April 19th 2016 we have taken a picture from virtually the exact same location. What you can see in the three pictures is the progress of the Bermuda grass each year in comparison to the last. First, not every aspect of the Bermuda grass health is due to our inputs. Weather plays the greatest roll. Warmer temperatures one year can lead to more green grass, and the Bermuda in the picture from 2016 has a yellow-green color to it, which is the result of the cold snap. However, looking closer at the spring dead spot disease circles, one can see that there are fewer and they are less severe each year that passes.

4/19/2015
4/19/2014


4/19/2016

Spring dead spot is a disease that we must slowly work against. It will never completely disappear, but we can continue to weaken the pathogen through our control program. We have made strides in the last two years and we will continue to adjust and improve our strategy.

Etiquette Reminder of the Month

When you splash bunker sand onto the green after your shot, please brush away any large piles or clumps that may have ended up on the green.


See you on the course!
Joe

jvillegas@bwrc.org

Monday, May 2, 2016

Seed head control test

Every year we strive to get better at each and every aspect of our maintenance practices on the golf course, and the entire Bretton Woods property. Our seed head control program is key to getting the season off to a good start and allowing the grass to be as healthy as it can heading into the summer months. This year, to gauge the effectiveness of our control program, we left a check plot on the chipping green.

Left side of white hash line is treated, right side untreated.
This area on the chipping green has not received a single seed head chemical control application yet this year. Our idea for this test was two-fold. First, we wanted to make sure that what we were doing was truly an effective way to manage seed heads. Are the chemicals we are using doing what they are supposed to do? Could we be using less, or different chemicals? While we were confident that our program was correct, because we had not observed the seed heads that we would have expected, we still used a control area to confirm our thoughts. Secondly, we thought this could be a strong visual aid for the membership to see what conditions could be like without the chemical control we implement. Not only would the putting surface be bumpy and inconsistent, but the health of the plants would suffer.

The proof of the success of our program is plainly visible at the chipping green. The chemicals we are using are doing exactly as they are supposed to, and the turf is responding just as we expected. This is not to say that we cannot still learn, make adjustments, and improve our program; but, we are on the right track and our program is built on a solid base.

Up-close picture of many, many seed heads.
The pictures included in this post provide a decent representation of the difference between the untreated side (right) and the treated side (left). However, to really see the difference, we invite you to take a look at the chipping green yourselves the next time you are over there. We have painted a line separating the two areas. Seeing it in person will give a much better understanding to the difference the chemicals make.

Even closer view of individual seed heads.


Once you have looked, if you have any other questions or thoughts, flag one of us down while you are on the course or send an email and we can continue the discussion

Etiquette Reminder of the Month

When you splash bunker sand onto the green after your shot, please brush away any large piles or clumps that may have ended up on the green.

See you on the course!
Joe

jvillegas@bwrc.org