Monday, March 28, 2022

Refurbishing alternate tee bridge

Hole #2 is the only one on the course with two separate sets of tees. The alternate tee is set at a completely different angle and requires crossing a small creek to access. A bridge was built at the same time as the tee, and it needed a facelift. One of the tasks we tackled in the late winter was to refurbish this bridge.

Overall, the bridge is in good shape. It does not see constant traffic since we rotate back and forth between the two tee complexes. For this work, we inspected all the boards and structure of the bridge. One tread was replaced. Several pickets were tightened. And one end of the hand railing was loose, so it was reinforced with more screws.

Power washing

Next, we power washed the entire bridge, cleaning years of grime and dirt off. This alone gave the wood a very new face. Once it was dry, we stained it to a natural tone. We also replaced the anti-slip tread on the walking surface with brand new material.

Once we get into more consistent warm weather and the Bermuda grass starts to grow, we will resume the use of the alternate tee. The bridge will be ready for the traffic.


Left half is power washed, the right
half is not


After first coat of stain; the left side
is stained, the right is not


Etiquette Reminder of the Month

Please remember to keep your cart on the cart path when we are “Cart Path Only.”

Also, as part of a Golf Committee initiative to improve course etiquette, we have included links to videos teaching proper on course etiquette. Please take a moment to watch:

Ball Marks - How to properly repair


See you on the course!

Joe

jvillegas@bwrc.org

Monday, March 21, 2022

Course care signs

Golf courses take a beating. Between all the maintenance that we perform, to the golf carts and foot traffic, and the divots and ball marks. Especially regarding the last couple of things on that list, golfers can make a difference in helping keep the course in good shape. We recently placed new signs on the water cooler stations to help remind everyone of this.

Every golfer, at some point during their round, will make a ball mark on the green. Most will take a divot. And many will find themselves in a bunker. Taking care of the course as you play is the best way to take care of the course, so it is in the best condition possible for the golfers behind you.

The new signs are simple but remind golfers of the three easiest ways for them to help with the maintenance of the course: replacing divots (or filling with sand), fixing ball marks, and raking bunkers. No one would have to play from an unfilled divot in the fairway. Or put over a ball mark on the green. Or hit out of a large footprint in a bunker.

If every golfer does each of these things each round, it would leave the course in good shape for all the golfers on a particular day. And everyone would get to play and enjoy the course without being affected by anyone else’s lack of responsibility.


Etiquette Reminder of the Month

Please remember to keep your cart on the cart path when we are “Cart Path Only.”

Also, as part of a Golf Committee initiative to improve course etiquette, we have included links to videos teaching proper on course etiquette. Please take a moment to watch:

Ball Marks - How to properly repair


See you on the course!

Joe

jvillegas@bwrc.org

Monday, March 14, 2022

Practice bunker renovation

We have two practice bunkers at our practice area: one greenside bunker and another that functions as a practice bunker for all longer bunker shots. This second bunker is located just over the hill to the far left of the driving range tee. In desperate need of a renovation, this winter we tackled the project.

The practice bunker after removal of old sod. Notice how 
the soil near the top is falling down into the sand.

The fairway practice bunker was left untouched during the long master plan renovations on the golf course. Built in a similar design as the original course bunkers and just as old, it had outlived its use. The sand washed down off the high face, became contaminated with silt, and clogged the internal drainage. Not to mention that it simply no longer matches the style of any other bunker on the course now. Since it is such a small bunker, and the only one in need of work, we did this project in house.


Redefining the edge of the bunker

Having watched all the bunkers on the course being built during construction, we had a good idea of how to reshape this practice bunker to match. Our main obstacle was the location: being built into the side of a hill and with nowhere else to relocate, we had to manage as best as we could with what we had. Our first goal was to remove the high-sand face that was constantly eroding in any rainstorm. We did this by hauling in fresh soil and building a “nose” that extends down towards the level of the sand. Now instead of the sand climbing up the face to the lip, the lip reaches down to the sand and allows for the bottom of the bunker to be flat, reducing the chance for erosion. Lessening the potential for silt contamination in the sand from storms, we also added all new drainage. Although the sand will still move in heavy rain, there will be far less silt mixing with the sand. Finally, new sod and new sand finished up the project.

New drainage installation. We are also beginning to 
add new soil to the high side to make a new lip.


Drainage finsished and soil added to upper edge. Compared to the
first picture, you can see how we brought the upper edge
down into the bunker further.

Completed new edge


New sod installed

Complete. With new sod and new sand


Although it took us longer than expected (cold, snow, frozen ground, etc.), we laid new sod down this past week. It will take some time for the sod to knit and be strong enough for traffic, but the bunker will easily be ready once the spring season gets going.


Etiquette Reminder of the Month

Please remember to keep your cart on the cart path when we are “Cart Path Only.”

Also, as part of a Golf Committee initiative to improve course etiquette, we have included links to videos teaching proper on course etiquette. Please take a moment to watch:

Ball Marks - How to properly repair


See you on the course!

Joe

jvillegas@bwrc.org

Friday, March 4, 2022

Culvert in #1 fairway

Though we don’t have many water features on the course, water management is still an integral part of our maintenance. Part of that is moving water around the property, specifically how the ponds on the course are connected. One of these connections was completely deteriorated and we replaced it last week.

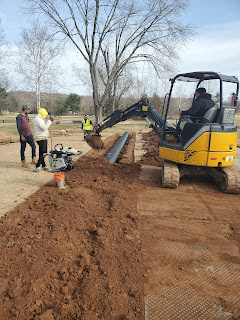
The pond that is to the right of #1 approach and left of #10 approach has a pipe that serves as an overflow release. It helps to regularly manage the height of the water and serves as an escape for excess water when we get heavy rains. The culvert was put in when the course and ponds were constructed over 50 years ago. The pipe was a standard corrugated metal pipe and served its purpose well. However, in the last few years it had started to fail. 


Exposed irrigation line

We repaired one sinkhole in the rough to the left of #1 fairway, just near the creek that runs towards #2 pond. Another sinkhole was developing in the fairway, nearer to the pond on #10 side. Knowing that these pipes do fail, like what happened at #9 pond, we didn’t want to risk waiting too long to replace the entire pipe.

A glimpse at the underside of the old pipe

We hired a contractor to help, and we started by removing the grass and exposing our irrigation lines. Next, they used a mini excavator to expose and remove the existing pipe. It was far more degraded than we expected. The entire underside of the pipe was decayed, from one end to the other. It was surprising that we did not have any more, or worse, sinkholes than we experienced already.

The trench after the old pipe had been removed

The pond on #10 was temporarily dammed while a new pipe was laid into the same trench as the old. The new pipe is heavy duty, solid walled, HDPE drain pipe, which will last many decades longer than the metal. Once the new pipe was in place and secured, the dam was removed. The remaining soil was positioned to cover the pipe, compacted, and the sod was laid back down. The entire pipe removal and installation was done in one day and the sod was put back in place the following morning.


Backfilling of the new pipe


Other than the recent sinkholes, this pipe would have been entirely unremarkable and inconsequential to golfers. And now, replacement of the pipe assures us that the new pipe will again fade into the background.


We are now back to our in-season schedule of one post per week.


Etiquette Reminder of the Month

Please remember to keep your cart on the cart path when we are “Cart Path Only.”

Also, as part of a Golf Committee initiative to improve course etiquette, we have included links to videos teaching proper on course etiquette. Please take a moment to watch:

Ball Marks - How to properly repair


See you on the course!

Joe

jvillegas@bwrc.org