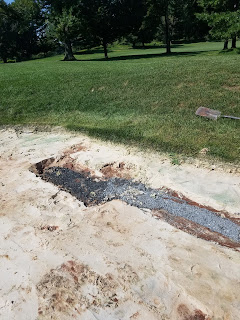
We completed the drain project near #10 green last week.
Here is a follow-up with some more specifics on what we did, with pictures as
well.
Although the weather was very hot for early September, it
was also, luckily, dry for a few days. This allowed us to get into the area
short of the right green bunker and add some additional drainage. First, we
stripped all of the grass off and cleared a large area for us to work. We then
exposed the drain that comes out of the bunker and tracked it to where it leads
across the approach. Next, we found where the ground water was surfacing. We
had originally planned on adding a surface drain where near this ground water
site, but it turned out to be within a couple of feet of the bunker drain.
 |
| If you look closely, you can see the intersection of 3 pipes. However, they are not connected and the water is release right back into the soil. |
The bunker drain is a perforated pipe that water can seep
into naturally; however, the ground water had been unable to reach the pipe and
instead had come up to the surface and caused issues. Since the drain pipe was
so close, we added a new trench from the ground water to the drain, added a bit
more of the same type of pipe, and gave the ground water direct access to the
drain. Now, it rises to the height of the drain, enters the pipe, and is
shuttled across the approach and into the pond.
 |
| This is an old drum barrel top that was placed over the junction of the 3 pipes to keep soil out. It was no longer working. |
We also discovered some old drain pipe that was no longer
functioning. Some water was flowing in the pipes, some around the pipes. One
piece was cut at both ends, allowing the water to empty right back into the
soil. We found another section of three pipes that converged, but none were
connected to one another. For a long time, the setup had worked adequately, but
we connected all three pipes and made other upgrades while we were there.
Finally, we did add one surface drain to capture any ground
water that may make it to the surface, or more likely, to capture water
draining along the surface in normal fashion. We placed this drain at the last
point, just before water would cross the approach. It is also linked to the
bunker drain system that takes water underground and into the pond.
 |
| The new pipe and drain inlet that we added. |
During this project, we also worked to contain the ground
water that was seeping out in the bunker. We opened the base of the bunker and
found the water. We did not want to dig too far down through the bunker and
ruin its shape and integrity, so instead we dug a trench laterally in both
directions. We filled these trenches with gravel, and once again connected them
to the drain that is in the bunker.
 |
| The new drains added to the bunker. The existing drain is in the middle, with the additions stretching to the left and right. |
Now, as the ground water reaches the gravel
trenches, it’s easiest direction of flow will be through the gravel, and into
the drain pipe.To complete the bunker repair, we then removed all of the
contaminated sand and debris that had accumulated through the season and added
fresh sand throughout the bunker.
The rain we received this summer made this area unplayable,
and maintenance impossible, from June through August. The additional drainage
will be a significant improvement
Etiquette Reminder of the Month
Also, as part of a Golf Committee initiative to improve
course etiquette, we have included links to videos teaching proper on course
etiquette. Please take a moment to watch:
See you on the course!
Joe
jvillegas@bwrc.org

No comments:
Post a Comment
Have a question or comment? Share it with Joe!